Model View View Model architecture pattern is the advanced version of MVC architecture pattern. MVVM architecture pattern allows us to make the project structural and easy to maintain. The files in the project are managed in their respective folders or places. So it is easy for any developer to find the files and maintain them.
The Basic difference between MVC and MVVM is, In MVVM there is an extra layer of model view that allows users to bind the view with the view model. So all the manipulation related to the data will be done in the View Model, so the view controller will remain separate from any kind of data manipulation. Also, one major difference is view will be bind with the View Model, so any update in the view model will reflect on the view controller.
We can also modify MVVM as per our needs and understanding. We can add extra layers to make it easier and more flexible to work on.
Singelton can also be implemented with the MVVM and other architecture
If you want to watch the video tutorial of this article, here you go:
Components of MVVM
MVVM basically contains 3 components.
- Model – Model is a wrapper which hold the data.
- View – Representation of UI or Views in the hierarchy.
- View Model – Controller act as a mediator between view and model and hold the business logics.
Each component has its own work and they combine together to give structure to your app.

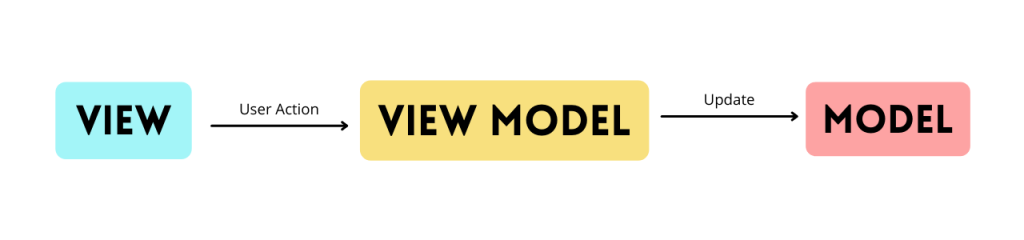
Data Flow in MVVM
In the above image, We are showing data flow between the different components of MVVM. So let’s understand how data is flowing between different components and layers.
- View –> View Model –> Model :- In this flow user will take action on view and those action will update the data in View Model. Then View Model will update the Model after putting bussiness logic or simply directly update the model.
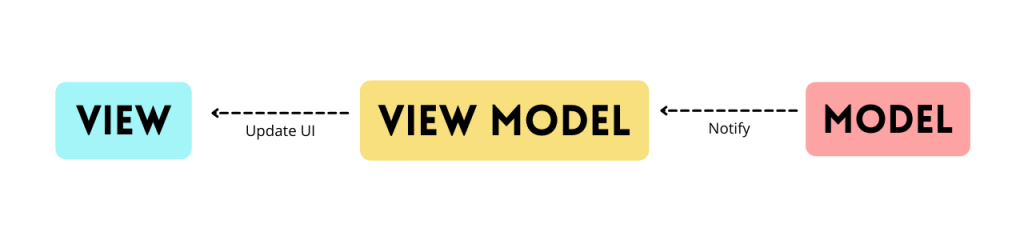
- Model –> View Model –> View : – In this flow once model get updated with the latest data it will notify to the View Model and View Model will update the newly data to view.
Practical use of MVVM in daily life
It’s time to implement what we have studied so far, Let’s create one demo application with the MVVM architecture in swift.
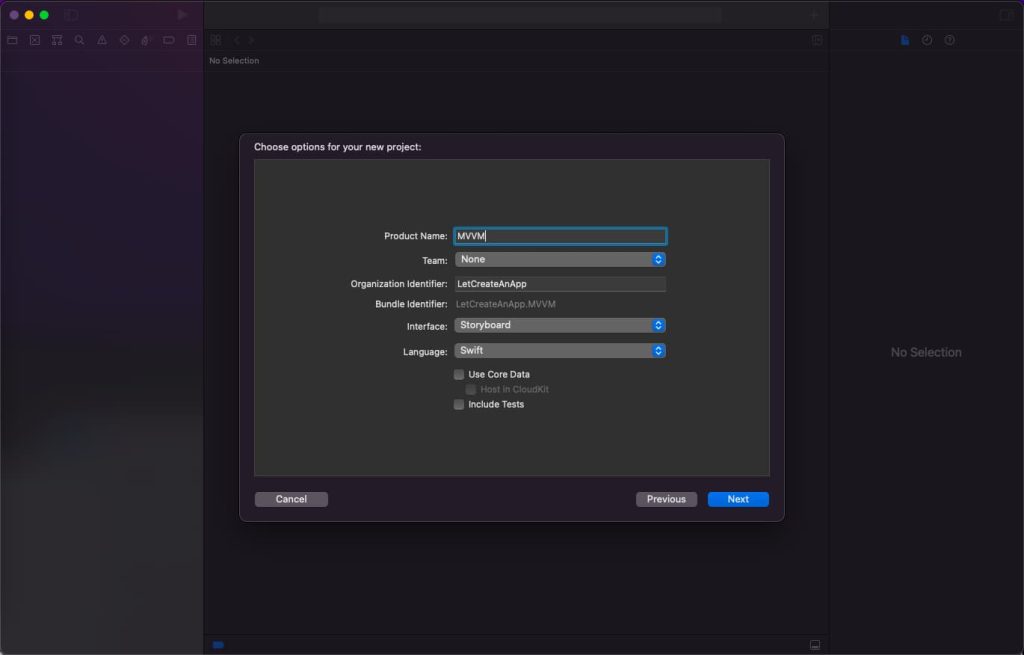
1. Create a New Swift Project
Open Xcode, Select App and click on next and give a proper name to the project and make sure to select the user interface should be Swift, and create the new project. Give the name according to your need.
2. Creating Model
Before jumping into the coding part of the project, we first create the folder structure of all the required components like Model, View Model, View Controller.
Now let’s first define the model class and create the model to save the data in that model.
struct DataModel: Codable {
    var data:QuestionModel?
}

struct QuestionModel: Codable {
    var questions: [Questions]?
}

struct Questions: Codable {
    var correct_answer: String?
    var option_1: String?
    var option_2: String?
    var option_3: String?
    var option_4: String?
    var question: String?
}
3. Call API and Fill Data Model
Now we will call the API, so our model get filled and we can access that model into the view controller to fill the view.
class QuestionViewModel {

    var questionData:DataModel?
    private let sourcesURL = URL(string: "https://quiz-68112-default-rtdb.firebaseio.com/quiz.json")!

    func apiToGetQuestionData(completion : @escaping () -> ()) {

        URLSession.shared.dataTask(with: sourcesURL) { [weak self] (data, urlResponse, error) in
            if let data = data {

                let jsonDecoder = JSONDecoder()

                let empData = try! jsonDecoder.decode(DataModel.self, from: data)
                self?.questionData = empData
                completion()
            }
        }.resume()
    }
}
4. Update View Controller
So, we get the data into the View Model class, now we have to update the View Controller with the data which we have got in the View Model.
So let’s design the UITableView on the screen and fill the question data in the table view which we have got from the View Model.
class ViewController: UIViewController {

    @IBOutlet weak var tableView: UITableView!

    var viewModel = QuestionViewModel()
    var quesitions:DataModel?

    override func viewDidLoad() {
        super.viewDidLoad()
        // Do any additional setup after loading the view.
        viewModel.apiToGetQuestionData { [weak self] in
            self?.quesitions = self?.viewModel.questionData

            DispatchQueue.main.async {
                self?.tableView.reloadData()
            }

        }
    }
}

extension ViewController: UITableViewDelegate, UITableViewDataSource {
    func tableView(_ tableView: UITableView, numberOfRowsInSection section: Int) -> Int {
        quesitions?.data?.questions?.count ?? 0
    }

    func tableView(_ tableView: UITableView, cellForRowAt indexPath: IndexPath) -> UITableViewCell {
        let cell = tableView.dequeueReusableCell(withIdentifier: "cell", for: indexPath)
        cell.textLabel?.text = quesitions?.data?.questions?[indexPath.row].question
        return cell
    }


}
Now we can run the project and check the complete functionality.
Download Resources for MVVM in Swift
Download the source code of MVVM in Swift.
I hope you like this tutorial and if you want any help let me know in the comment section.
Stay tuned, there is way more to come! follow me on Youtube, Instagram, Twitter. So you don’t miss out on all future Articles and Video tutorials.
. . .
I am delighted that you read my article! If you have any suggestions do let me know! I’d love to hear from you. ????

About the Author
Shubham Agarwal is a passionate and technical-driven professional with 5+ years of experience in multiple domains like Salesforce, and iOS Mobile Application Development. He also provides training in both domains, So if you looking for someone to provide you with a basic to advance understanding of any of the domains feel free to contact him


Pingback: Quiz App in Swift - Let Create An App
Pingback: Create Singleton class in Swift 5 in 2022 - Let Create An App
which is best Alamofire or URL Session
URL Session
Hello, of course this piece of writing is truly nice and I have learned lot of
things from it about blogging. thanks.