Custom Setting in Salesforce is similar to Custom Object in Salesforce. It generally allows the user to create custom sets of data which is associated with an organization, profile, or specific user. Custom Setting is a way through which anyone can get easier and faster access to data.
The data is stored in a custom setting and will be retrieved without the use of any SOQL, hence there is no requirement for any SOQL query to be used.
Custom Objects are specifically built by Salesforce Developers to store necessary business information. Similarly, Custom settings are also built to store business information which static in nature. The visibility of custom settings can be controlled by marking it as Public or Protected.
The custom setting has one limitation, we can not deploy them to other org. To overcome this limitation, Salesforce introduces Custom Metadata types in salesforce which can also allow us to deploy the setting from one org to another org using a changeset.
Types of Custom Settings
There are two types of Custom Settings in Salesforce
- List Custom Setting
- Hierarchy Custom Setting
List Custom Settings in Salesforce
List custom settings that are very similar to how custom objects work. The main purpose of this configuration is to cache the required data without using any SOQL query.
This setting is directly visible to all the users with respect to the visibility setting of custom settings and access throughout the organization.
Creating List Custom Setting in Salesforce
So let’s take an example of a Country and its Currency to understand list custom settings.
Step 1:
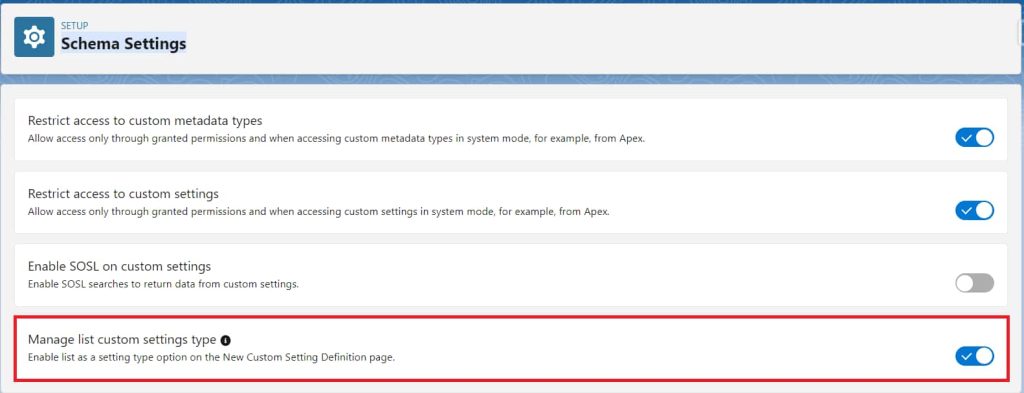
By default List, the Custom setting is disabled in Salesforce, so first, we need to enable this setting from Home | Quick Find | Schema Settings.
We need to enable the ‘Manage list custom settings type’ option, which enables the list as a setting type option on the New Custom Setting Definition page.
Step 2:
Search Custom setting in the Quick Find box and select Custom Setting. The Custom Setting page will open and you need to click on the new button. The custom setting window will open
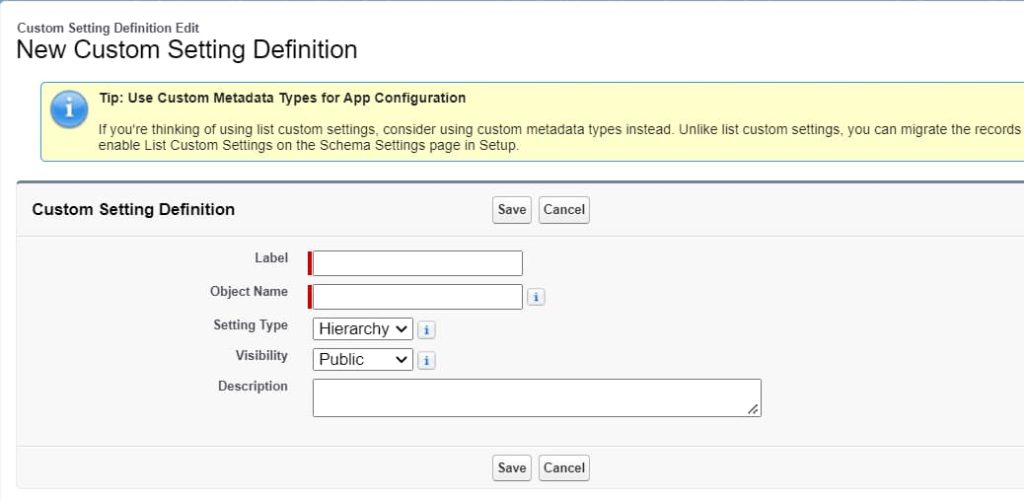
Now, we need to provide the Label as Name and Object Name as the API name of this custom setting, the same as we are using in the Custom Object. These 2 properties use to fetch the data, which is stored in this custom setting.
Step 3:
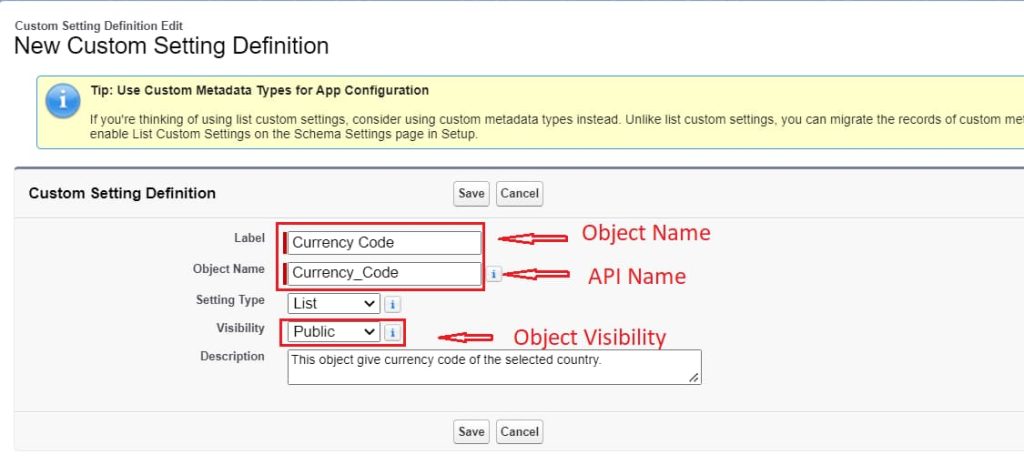
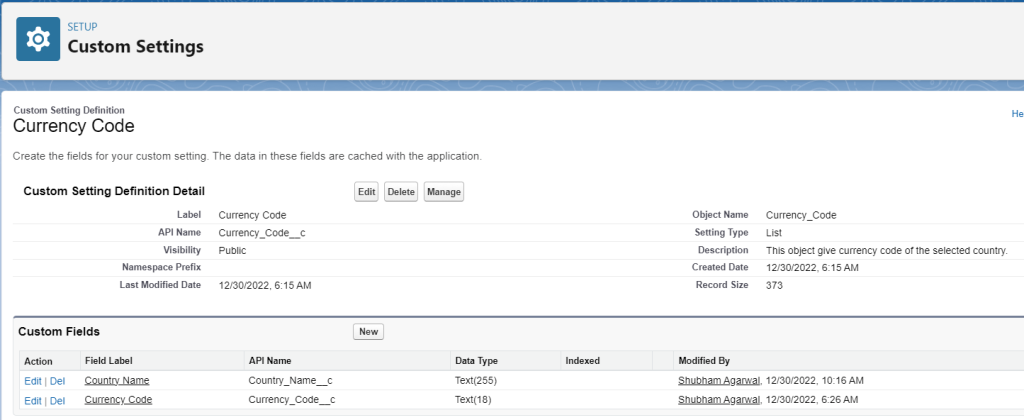
So we are taking an example of Country and Currency, so we give the name Currency Code to this custom setting. We also need to change the Setting type to List and make the visibility to the public.
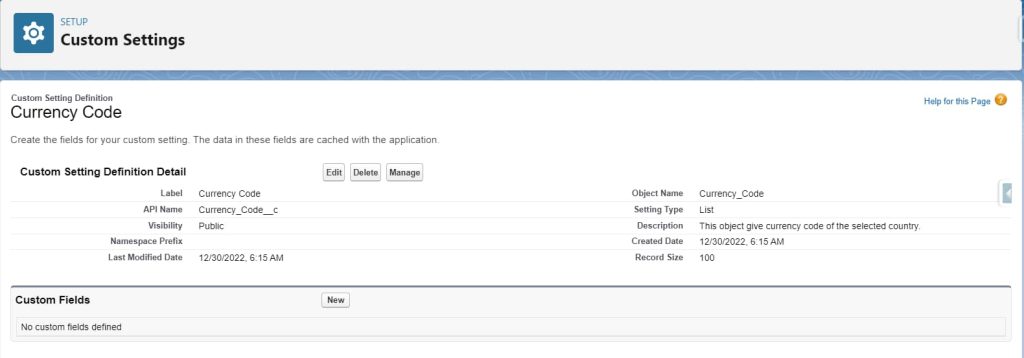
Click on Save and your Custom Setting is created.
Step 4:
Now, as we are creating fields in Custom Object, similarly we will create fields in this newly created custom setting. For creating fields click on the New button.
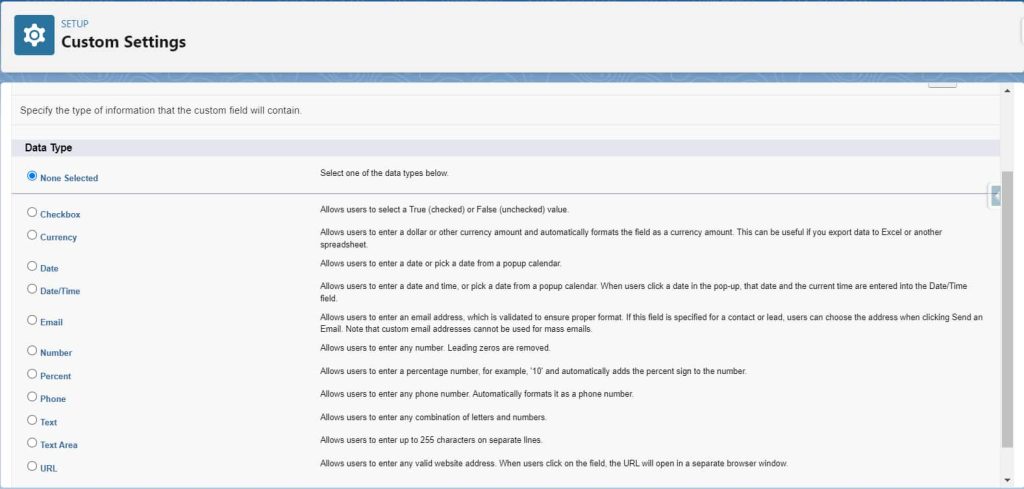
Select the data type of the field which we want to create on this custom setting, we are creating currency code as a text-type field.

Once all the details fields are filled, click on Next and then click on Save. The Currency Code field is created in this custom setting. Similarly, we will add one more field name as the Country Name of the text type. Once both the field added in the Custom Setting it will look like this.
Step 5:
Now our schema of Custom Setting is ready, Let’s create a record in this Custom Setting. Click on the Manage button at the top and click on the New button.
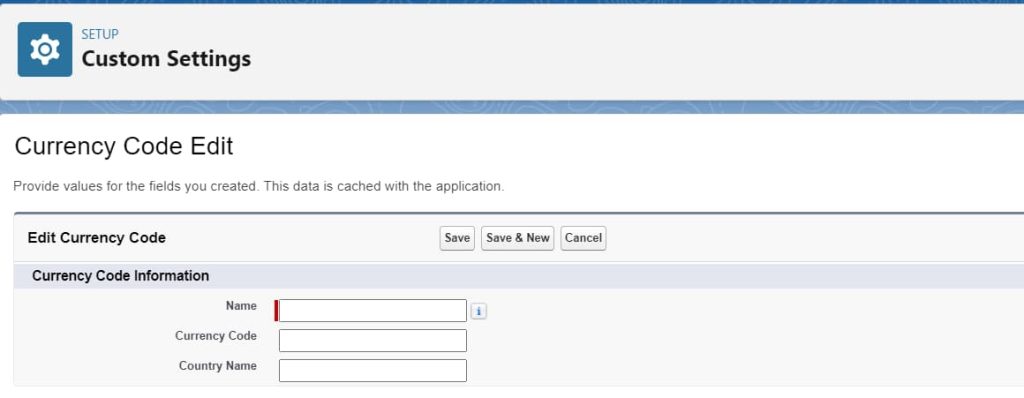
Enter the Name of the record same as we are doing in Custom Object and also pass Currency Code and Country Name and click on Save.
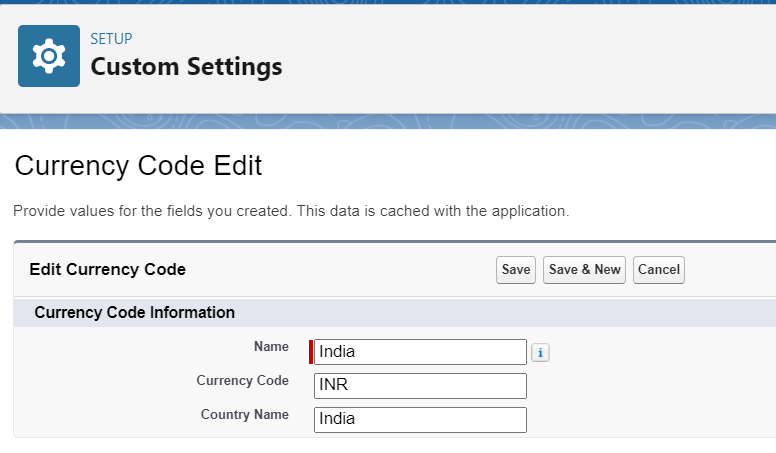
So this record is created in Custom Setting. You can also create multiple records in this custom setting. We have also added the USA currency code in this Custom Setting.
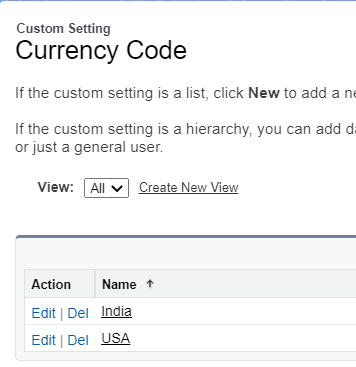
Your List Custom Setting is now ready and you can access these records in your org anywhere without a query from the Database.
Hierarchy Custom Setting
Hierarchy Custom Setting uses build-in hierarchy logic which controls the visibility of the data on the bases of organization, profile, and user current settings and makes the data visible to them accordingly.
Creating Hierarchy Custom Setting in Salesforce
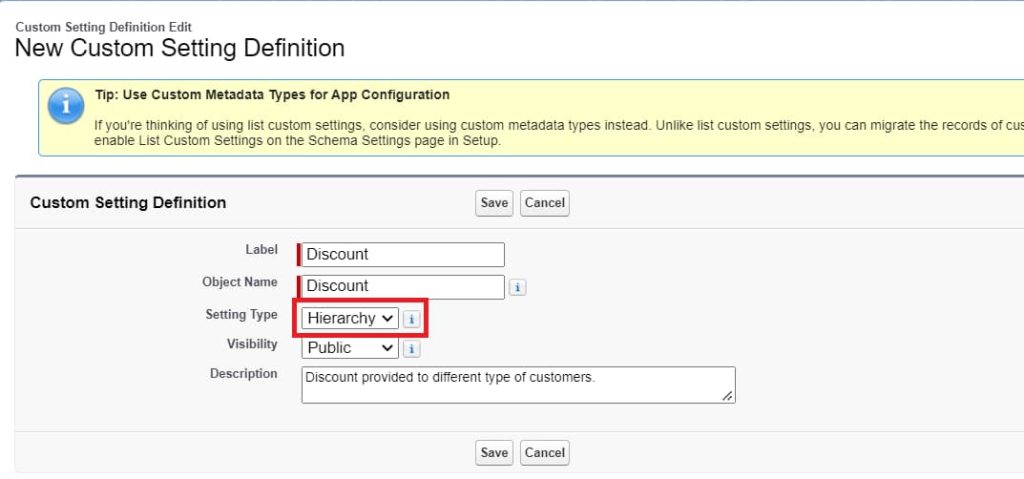
So let’s take an example of Discounts provided to different users, a regular user gets a 10% discount, and the prime user will get a 20% discount.
Step 1:
Create the new Custom Setting with the name Discount. Be sure to select the setting type as Hierarchy rest the things will remain like List Custom Setting. Click on the Save button to create hierarchy setting.
Step 2:
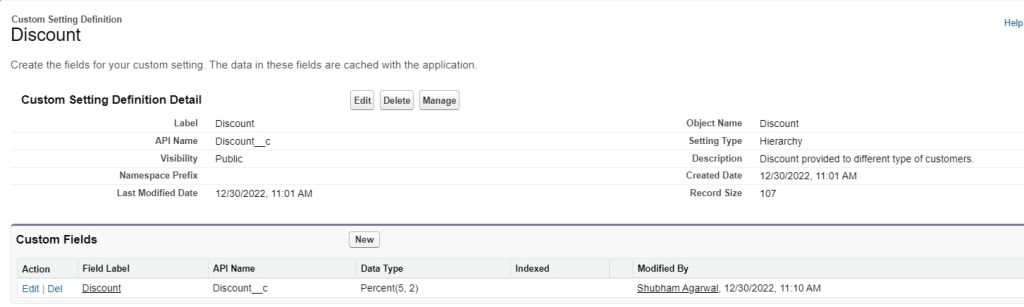
Now, create one field on this newly created hierarchy setting called ‘Discount’ of percentage type.
Step 3:
Let’s create some records on this custom setting. Click on the Manage button to create the record on this setting.
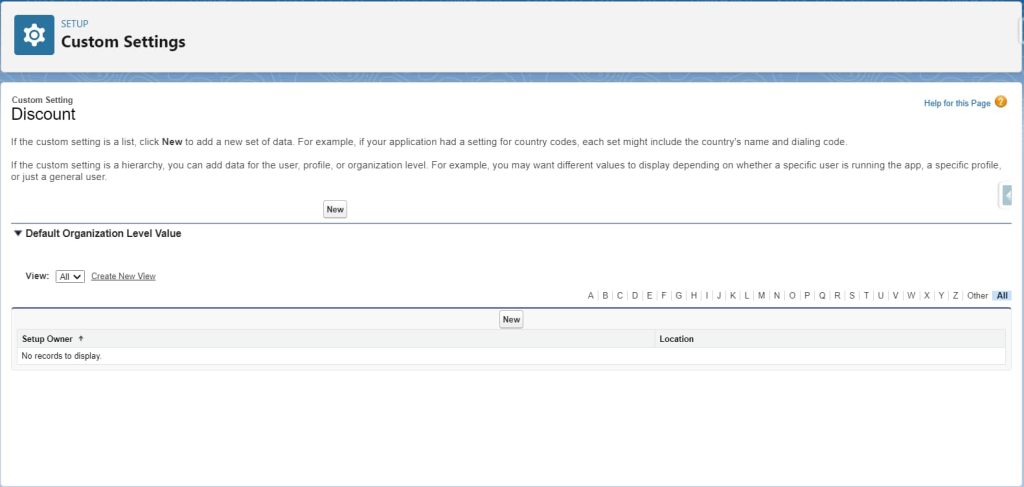
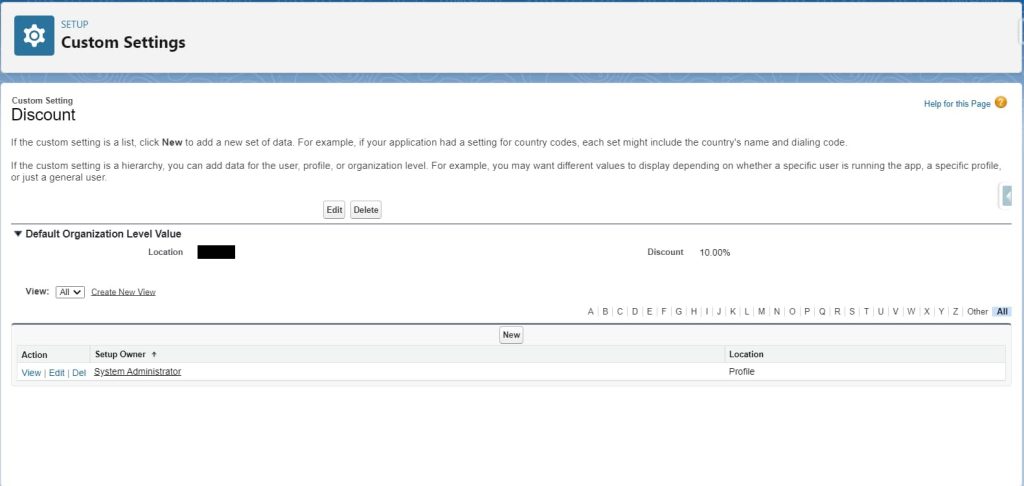
You will see 2 sections on this screen, first section is the Default organization level value section. In this section, we will add the data which is common for organizations, irrespective of their profile, role, etc. So click on the New button and create a common discount of 10% for the complete organization.
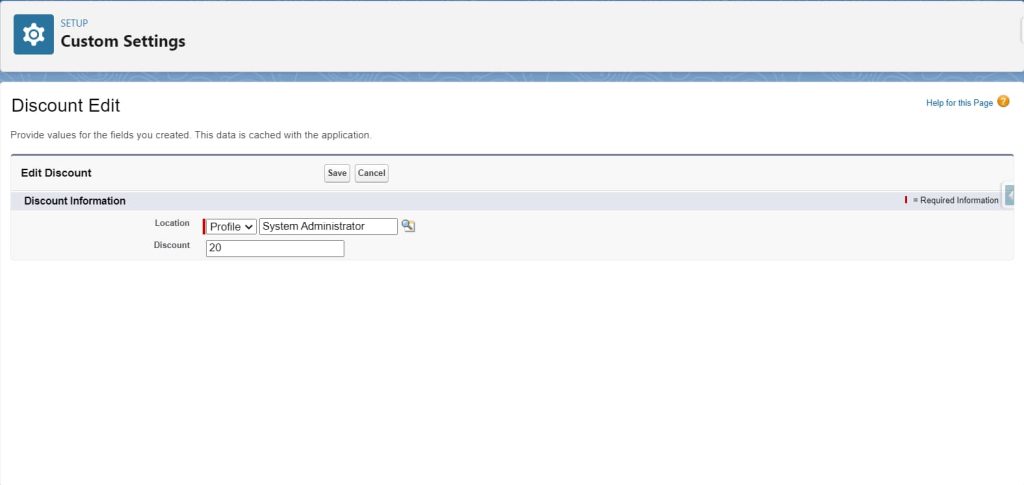
For creating a record specific to the user or profile, click the New button which is at the bottom. Select the user or profile as per your need and provide the discount as shown in the below image.
Now, we have 2 types of records in this custom setting, organization-level records and user/profile-level records. Both look something like below.
We are all set to use the custom setting in our apex. We can fetch all the records which are created in the Custom Setting in Salesforce by using simple code.
Accessing List Custom Setting Data
Map<String, Currency_Code__c> settingValue =Currency_Code__c.getAll();
System.debug('Map'+settingValue.get('India'));

System.debug('Custom deta'+Currency_Code__c.getValues('India'));
Accessing Hierarchy Custom Setting Data
Discount__c settingValue =Discount__c.getInstance();
Discount__c settingValue =Discount__c.getInstance(userId/ProfileId);
Discount__c settingValue =Discount__c.getOrgDefaults();
System.debug(settingValue);
You can get all the custom settings if you use the above code.
Congratulations!
You’ve successfully created Custom Object in Salesforce.
I hope you like this tutorial and if you want any help let me know in the comment section.
Stay tuned, there is way more to come! follow me on Youtube, Instagram, Twitter, and LinkedIn. So you don’t miss out on all future Articles and Video tutorials.
. . .
I am delighted that you read my article! If you have any suggestions do let me know! I’d love to hear from you. ????

About the Author
Shubham Agarwal is a passionate and technical-driven professional with 5+ years of experience in multiple domains like Salesforce, and iOS Mobile Application Development. He also provides training in both domains, So if you looking for someone to provide you with a basic to advance understanding of any of the domains feel free to contact him


Pingback: Custom Metadata Types in Salesforce - Let Create An App