Model View Controller in Swift is very common architecture pattern in iOS mobile application development. MVC architecture pattern allow us to make the project structural and easy to maintain. All the files in the project are manage in their respective folders or places, so it is easy for any developer to find the files and maintain them.
In this tutorial, We will discuss about MVC architecture pattern that, how MVC divide the project into different smaller modules. These smaller modules then combine together to achieve some functionality. These small modules are reusable, so we can reuse them in different modules. MVC in swift allow developers to increase the code readability and reusability.
If you want to watch the video tutorial of this article, here you go:
Prerequisite:
You should have a knowledge of how to install pods in project and how to implement UITableView to show the data.
Components of MVC
MVC basically contain 3 components.
- Model – Model is a wrapper which hold the data.
- View – Representation of UI or Views in the hierarchy.
- Controller – Controller act as a mediator between view and model and hold the business logics.
Each component have its own work and they combine together to give structure to your app.

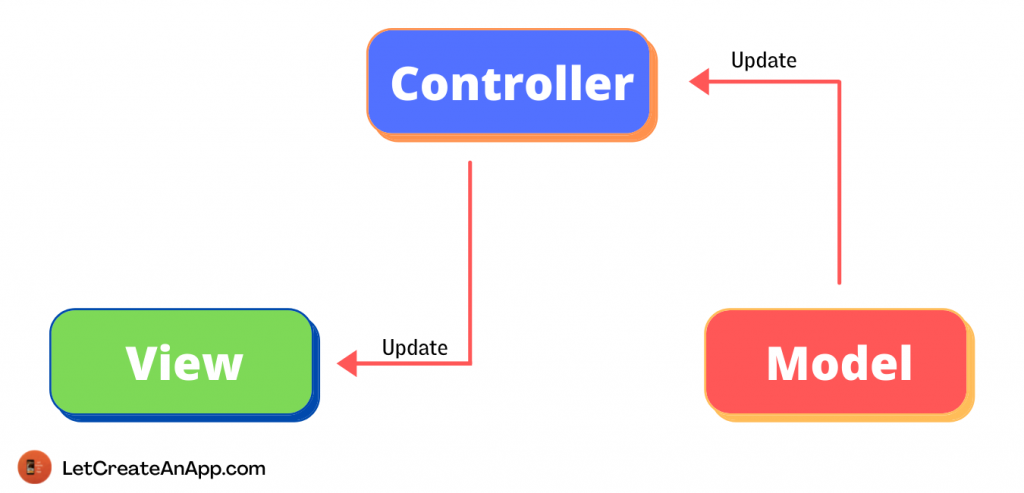
Data flow in MVC
In the above image, We are showing data flow between the different components of MVC. This data flow will take in 2 direction.
- View –> Controller –> Model in this flow user take action on the view and that action will take by view controller and perform some API calls and fetch the data. Now views will get update by this data which is coming from the API.
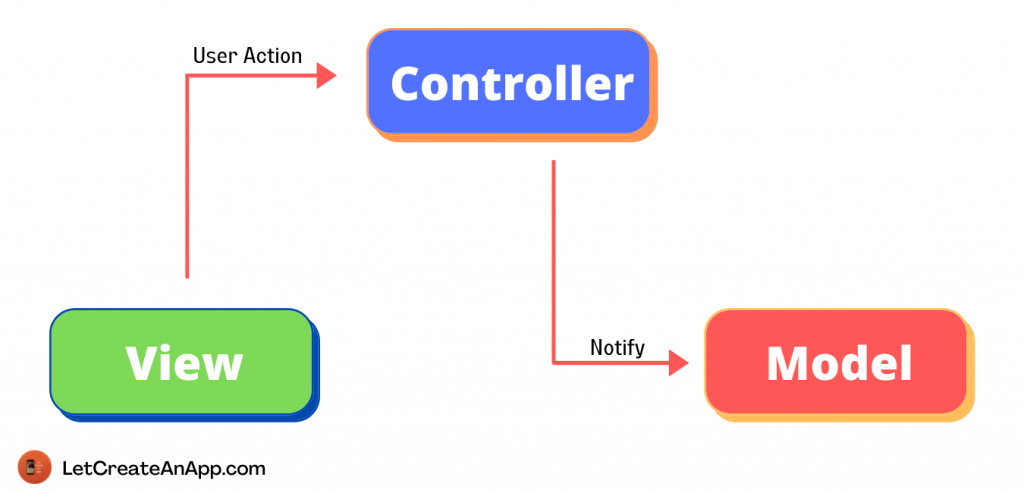
- Model –> Controller — View in this flow when API fetch the data we will fill the model with the data and then model will update variables on the controller. Now after variables get updated, controller update the views.
Practical use of MVC in swift
It’s time to implement what we have studied till so far, Let’s create one demo application with the MVC architecture in swift.
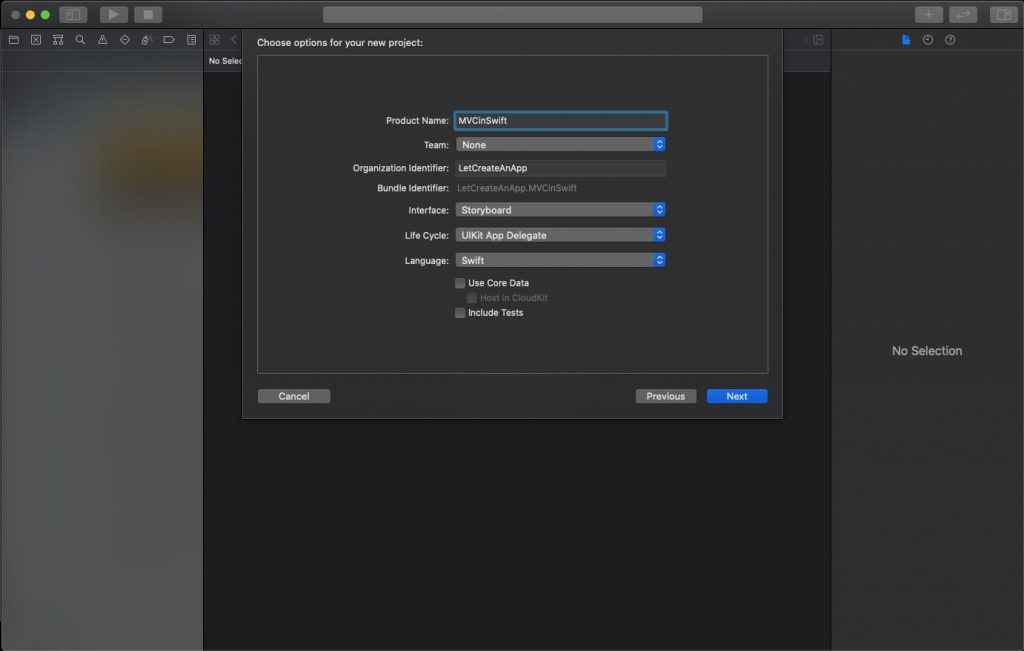
1. Create a New Swift Project
Open Xcode, Select App and click on next and give a proper name to the project and make sure to select the user interface should be Swift, and create the new project. Give the name according to your need.
2. Install the pods
First, we need to implement the mechanism by which we can call the API’s in to the app, so we can fetch the data from the server and show the data on the screen. For calling the API’s we are using “Alamofire” pod to make the network calls. You can install the same pod into your system or you use NSSessionURL or anything which you are using for API calls.
Add the below pod into the pod file, if you don’t know how to install the pods, please watch How to Install Pods in iOS
pod 'Alamofire', '~> 4.9.1' 3. Call the API and Fill Model with Data
After successful pod installation, we will call the API for which we need to show the data on the screen. We are using public API for fetching the data from the server. You can use these API or real time times as per your need.
API URL: https://jsonplaceholder.typicode.com/posts
You can fetch the data from this API and use this data to show into the applications.
Now, We need to create the model class which hold the data which is coming from the API and we use this model to show the data on the screen or update any view with the new data.
Take a new class DataModel.class and use the below code to create model.
class DataModel: Codable {
   var userId: Int?
   var id: Int?
   var title: String?
   var body: String?
}
Our model is created, now we call the API from view controller. So create one method in view controller callAPI(). In this method we call the request method of Alamofire to fetch the data from server. For storing the data into the variable we need to create one variable of model type, so it can hold the data in it. We use this model only to show the data on the screen.
var responseArray = [DataModel]()

  func callAPI() {
     Alamofire.request(URL(string: "https://jsonplaceholder.typicode.com/posts")!,                         method: .post,
                       parameters: nil,
                       headers: nil)
     .responseJSON { response in
            if let responseData = response.data {
                   do {
                       let decodeJson = JSONDecoder()
                       decodeJson.keyDecodingStrategy = .convertFromSnakeCase
                       self.responseArray =  try decodeJson.decode([DataModel].self, from: responseData)
                       self.tableView.reloadData()
                     } catch {
                         // Catch the error and handle it.
                         print("error")
                     }
                 }
             }
     }
If you call this method from viewDidLoad(), So when view controller get intialize it will call this method and fetch the response.
override func viewDidLoad() {
      super.viewDidLoad()
      callAPI()
}
Run the application, You will see the API get called and data coming from the API. This data is stored into the responseArray variable, use this variable to show the data.
We are using UITableView to show the loaded data on the screen. So implement basic tableview on the storyboard and populate it with the data which we get with the above API.
extension ViewController: UITableViewDelegate, UITableViewDataSource {

     func tableView(_ tableView: UITableView, numberOfRowsInSection section: Int) -> Int {
         return responseArray.count
     }

     func tableView(_ tableView: UITableView, cellForRowAt indexPath: IndexPath) -> UITableViewCell {
         let cell = tableView.dequeueReusableCell(withIdentifier: "cell", for: indexPath)
         cell.textLabel?.text = String(responseArray[indexPath.row].id ?? 0)
         cell.detailTextLabel?.text = responseArray[indexPath.row].title
         return cell
     }
 }
Now we can run the project and check the complete functionality.
Download Resources for Model View Controller in Swift
Download the source code of Model View Controller in Swift.
I hope you like this tutorial and if you want any help let me know in the comment section.
Stay tuned, there is way more to come! follow me on Youtube, Instagram, Twitter. So you don’t miss out on all future Articles and Video tutorials.
. . .
I am delighted that you read my article! If you have any suggestions do let me know! I’d love to hear from you. ????

About the Author
Shubham Agarwal is a passionate and technical-driven professional with 5+ years of experience in multiple domains like Salesforce, and iOS Mobile Application Development. He also provides training in both domains, So if you looking for someone to provide you with a basic to advance understanding of any of the domains feel free to contact him

Pingback: MVVM in Swift - Let Create An App
Pingback: Create Singleton class in Swift 5 in 2022 - Let Create An App
I will right away take hold of your rss as I can not to find your email subscription link or e-newsletter
service. Do you have any? Kindly allow me understand in order that I may subscribe.
Thanks.