Animations in the applications are the key elements to hold the user and also enhances the user experience which lets the user use the application more.
In this tutorial, we will learn how to create pulsing animation in swift when the user taps on UIButton. When the user taps on the button it will show a pulse around the button, and these pulses can be configurable according to your need.
Here’s is the video if you prefer video over text.
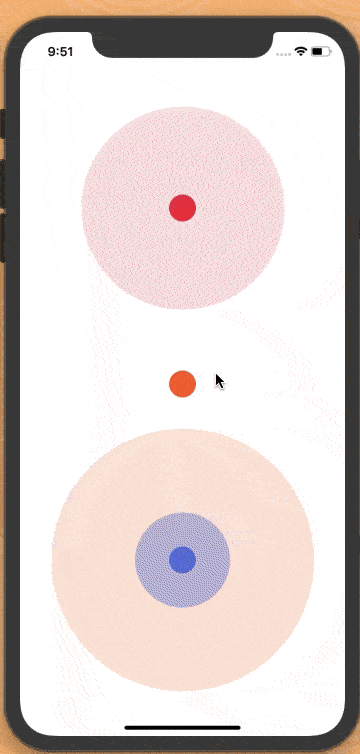
Final Output:
1. Create a New Swift Project
Open Xcode, Select App and click on next and give a proper name to the project and make sure to select the user interface should be Swift, and create the new project. Give the name according to your need.
2. Create Basic Layout and Actions
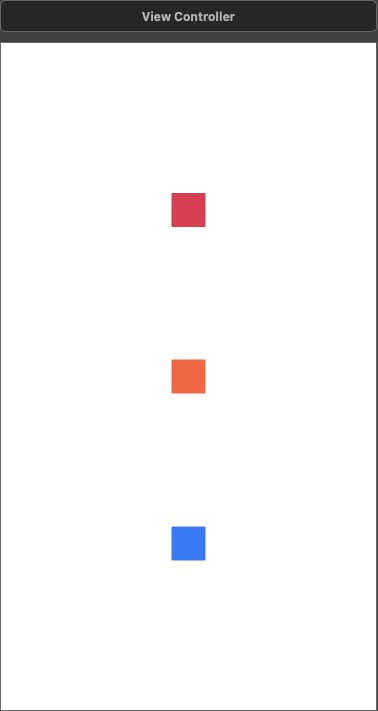
First. create 3 button on the storyboard and take the action on ViewController.swift file.
@IBAction func onClickRedButton(_ sender: UIButton) {
     // Action of Red Button
}

@IBAction func onClickOrange(_ sender: UIButton) {
     // Action of Orange Button
}

@IBAction func onClickBlue(_ sender: UIButton) {
     // Action of Blue Button
}
3. Create Pulse Animation Class
Now, we will create one class for pulse animation, so whenever we want to apply pulse animation, we need to create the object of this class and configure properties according to our need.
Add file PulseAnimation.swift, in this file create one class, PulseAnimation which inherit CALayer.
class PulseAnimation: CALayer {
   // Pulse Animation class
}
Now, we will define the default initializer and custom initializer in the animation class, with the help of a custom initializer we can configure pulses, radius, etc according to our need.
override init(layer: Any) {
     super.init(layer: layer)
     // This is the default initializer
}

required init?(coder aDecoder: NSCoder) {
     fatalError("init(coder:) has not been implemented")
     // This is the required initializer
}

init(numberOfPulse: Float = Float.infinity, radius: CGFloat, postion: CGPoint) {
     // Custom initializer with parameters.
}
Now, we have to take some local variable into the PulseAnimation class.
var animationGroup = CAAnimationGroup()
var animationDuration: TimeInterval = 1.5
var radius: CGFloat = 200
var numebrOfPulse: Float = Float.infinity
4. Creating Animation
Now, we will see how we create pulse. We are using 2 animation at the same to achieve pulse animation.
- Scale Animation helps to expand the pulse from 0 radius to n radius.
func scaleAnimation() -> CABasicAnimation {
     let scaleAnimaton = CABasicAnimation(keyPath: "transform.scale.xy")
     scaleAnimaton.fromValue = NSNumber(value: 0)
     scaleAnimaton.toValue = NSNumber(value: 1)
     scaleAnimaton.duration = animationDuration
     return scaleAnimaton
} - Opacity Animation helps to change view opacity when pulse size increases.
func createOpacityAnimation() -> CAKeyframeAnimation {
     let opacityAnimiation = CAKeyframeAnimation(keyPath: "opacity")
     opacityAnimiation.duration = animationDuration
     opacityAnimiation.values = [0.4,0.8,0]
     opacityAnimiation.keyTimes = [0,0.3,1]
     return opacityAnimiation
}
Now, group these animations.
func setupAnimationGroup() {
      self.animationGroup.duration = animationDuration
      self.animationGroup.repeatCount = numebrOfPulse
      let defaultCurve = CAMediaTimingFunction(name: CAMediaTimingFunctionName.default)
      self.animationGroup.timingFunction = defaultCurve
      self.animationGroup.animations = [scaleAnimation(),createOpacityAnimation()]
}
Call the above method in user defined init method & add the animation group into the layer.
We will all configure properties in this method.
init(numberOfPulse: Float = Float.infinity, radius: CGFloat, postion: CGPoint){
       super.init()
       self.backgroundColor = UIColor.black.cgColor
       self.contentsScale = UIScreen.main.scale
       self.opacity = 0
       self.radius = radius
       self.numebrOfPulse = numberOfPulse
       self.position = postion

       self.bounds = CGRect(x: 0, y: 0, width: radius*2, height: radius*2)
       self.cornerRadius = radius

       DispatchQueue.global(qos: .default).async {
           self.setupAnimationGroup()
           DispatchQueue.main.async {
                self.add(self.animationGroup, forKey: "pulse")
          }
       }
 }
5. Use Pulse Animation class.
To use this class in view controller we simply create the object of the pulse animation class and configure the properties as our needs.
@IBAction func onClickRedButton(_ sender: UIButton) {
       let pulse = PulseAnimation(numberOfPulse: Float.infinity, radius: 150, postion: sender.center)
       pulse.animationDuration = 1.0
       pulse.backgroundColor =  colorLiteral(red: 0.8993218541, green: 0.1372507513, blue: 0.2670814395, alpha: 1)
       self.view.layer.insertSublayer(pulse, below: self.view.layer)
     }

@IBAction func onClickOrange(_ sender: UIButton) {
       let pulse = PulseAnimation(numberOfPulse: Float.infinity, radius: 120, postion: sender.center)
       pulse.animationDuration = 1.2
       pulse.backgroundColor =  colorLiteral(red: 1, green: 0.3653766513, blue: 0.1507387459, alpha: 1)
       self.view.layer.insertSublayer(pulse, below: self.view.layer)
     }
@IBAction func onClickBlue(_ sender: UIButton) {
       let pulse = PulseAnimation(numberOfPulse: Float.infinity, radius: 100, postion: sender.center)
       pulse.animationDuration = 1.0
       pulse.backgroundColor =  colorLiteral(red: 0.2247976189, green: 0.4235115114, blue: 1, alpha: 1)
       self.view.layer.insertSublayer(pulse, below: self.view.layer)
       let pulse1 = PulseAnimation(numberOfPulse: 15, radius: 200, postion: sender.center)
       pulse1.animationDuration = 1.4
       pulse1.backgroundColor =  colorLiteral(red: 1, green: 0.3653766513, blue: 0.1507387459, alpha: 1)
       self.view.layer.insertSublayer(pulse1, below: self.view.layer)
     }
We can define multiple pulse on the same button with different time and configuration to enhance the effect as you can see in the blue button in the above code.
Now we can run the project and check the complete functionality.
Download Resources for Create Pulsing Animation in Swift
You can download the source code of Create Pulsing Animation in Swift project from this GitHub.
I hope you like this tutorial and if you want any help let me know in the comment section.
Stay tuned, there is way more to come! follow me on Youtube, Instagram, Twitter. So you don’t miss out on all future Articles and Video tutorials.
. . .
I am delighted that you read my article! If you have any suggestions do let me know! I’d love to hear from you. ????

About the Author
Shubham Agarwal is a passionate and technical-driven professional with 5+ years of experience in multiple domains like Salesforce, and iOS Mobile Application Development. He also provides training in both domains, So if you looking for someone to provide you with a basic to advance understanding of any of the domains feel free to contact him