In this tutorial, we are going to talk about, how we can Add or Delete cells from TableView in swift. Adding and Deleting cells are very common in day-to-day development tasks. We need to add the cell to display the information and delete it to remove it.
Here’s is the video if you prefer video over text.
1. Create a New Swift Project
Open Xcode, Select App and click on next and give a proper name to the project and make sure to select the user interface should be Swift, and create the new project. Give the name according to your need.
2. Create Basic Design
Before moving into the code part we need to create the basic design so we can add the data into the table view and we also need to set up the basic table view datasource and delegate methods.
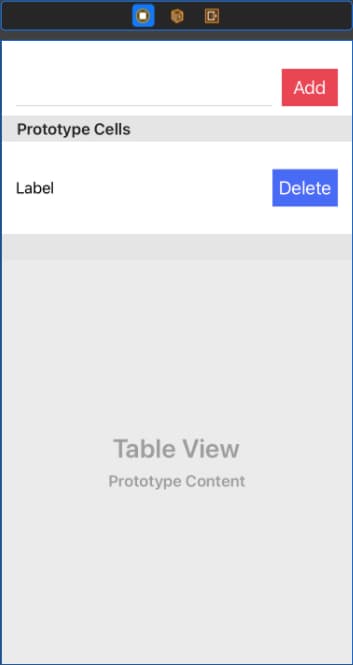
In the above design, we have to take a separate section for adding the element into the cell, so when users click on the Add Button it will add the text which is placed in the text field as a cell.
A delete button is placed into the cell, so when the user press deletes button in the cell it will delete that cell and remove that row from the table view with some animation.
3. Populate TableView
Now, we need to take the outlets of things which we have designed on the screen.
@IBOutlet weak var btnAdd: UIButton!
@IBOutlet weak var txtInput: UITextField!
@IBOutlet weak var tableView: UITableView!
We also need to take an array of string. This array act as a datasource of tableview and any operation of add or delete we will perform on this array.
var stringArr = [String]() Populate the tableview with its DataSource and Delegate methods.
extension ViewController: UITableViewDelegate, UITableViewDataSource {
     func tableView(_ tableView: UITableView, numberOfRowsInSection section: Int) -> Int {
         return stringArr.count
     }

     func tableView(_ tableView: UITableView, cellForRowAt indexPath: IndexPath) -> UITableViewCell {
         guard let cell = tableView.dequeueReusableCell(withIdentifier: "EditTableViewCell", for: indexPath) as? EditTableViewCell else {return UITableViewCell()}
         cell.lblName.text = stringArr[indexPath.row]
         return cell
     }

     func tableView(_ tableView: UITableView, heightForRowAt indexPath: IndexPath) -> CGFloat {
         return 70
     }
 }
We are simply showing the things which are added into the stringArr array.
Initially the Table view will show 0 rows or empty rows, cause there is no element is added into the stringArr array, once we start adding rows into the tableview then it will start showing rows into the tableview.
4. Define Actions
First, we have to add the actions for the Add Button and Delete Button. Add Button is used to add the entered string into the table view cell and the Delete Button is used to delete that row from the table view.
@IBAction func onClickAddButton(_ sender: Any) {
         if let txt = txtInput.text, !txt.isEmpty {
             self.stringArr.insert(txt, at: 0)
             tableView.beginUpdates()
             tableView.insertRows(at: [IndexPath(row: 0, section: 0)], with: .right)
             tableView.endUpdates()

             txtInput.text = nil
         }
     }
In the above code, we are checking the text field is empty or not. If a text field is not empty then we need to add that text into the stringArr.
After checking, we are inserting the entered text into the array at 0 index. So new values will always show at the top on the table view. After that, we need to add the row into the table view at index path 0 and remove the values from the input textfield.
Run the application and you can add the cell when you tap on Add Button.

Now, we will Delete the cell from the tableview when use click on the Delete button on the cell.
@IBAction func onClickDeleteButton(_ sender: UIButton) {
      let point = sender.convert(CGPoint.zero, to: tableView)
      guard let indexpath = tableView.indexPathForRow(at: point) else {return}
      stringArr.remove(at: indexpath.row)
      tableView.beginUpdates()
      tableView.deleteRows(at: [IndexPath(row: indexpath.row, section: 0)], with: .left)
      tableView.endUpdates()
     }
Now we can run the project and check the complete functionality.
Download Resources for Add and Delete cells from TableView in Swift 5
You can download the source code of Add and Delete cells from TableView in Swift 5 project from this Link.
I hope you like this tutorial and if you want any help let me know in the comment section.
Stay tuned, there is way more to come! follow me on Youtube, Instagram, Twitter. So you don’t miss out on all future Articles and Video tutorials.
. . .
I am delighted that you read my article! If you have any suggestions do let me know! I’d love to hear from you. ????

About the Author
Shubham Agarwal is a passionate and technical-driven professional with 5+ years of experience in multiple domains like Salesforce, and iOS Mobile Application Development. He also provides training in both domains, So if you looking for someone to provide you with a basic to advance understanding of any of the domains feel free to contact him


ur program gives an error for me while the insert button clicks
erminating app due to uncaught exception ‘NSInternalInconsistencyException’, reason: ‘attempt to insert row 0 into section 0, but there are only 0 rows in section 0 after the update’
You might be doing something wrong, please share your code with me on the below address. I will look into the code and get back to you.