Facebook Layout is a little challenging layout cause it contains lots of complex UI elements. In this Tutorial, we are see going to see how we can create the Facebook layout in SwiftUI.
In SwiftUI it is easy to separate the UI elements and combine them on the Main screen to the get desired results. We can also use these separated elements at other places, so the reusability of the code get increases.
If you want to watch the video tutorial of this article, here you go:
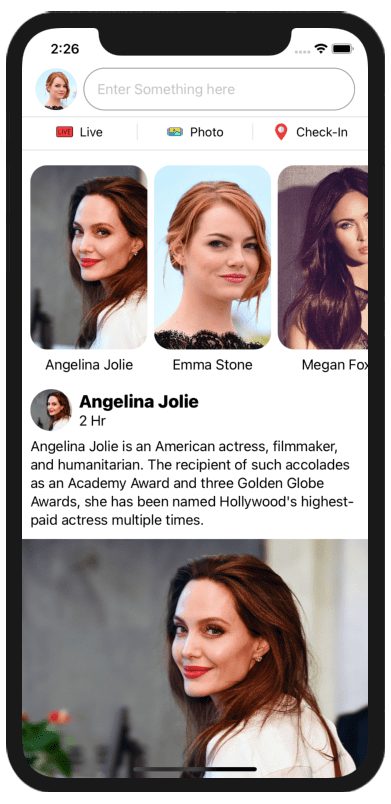
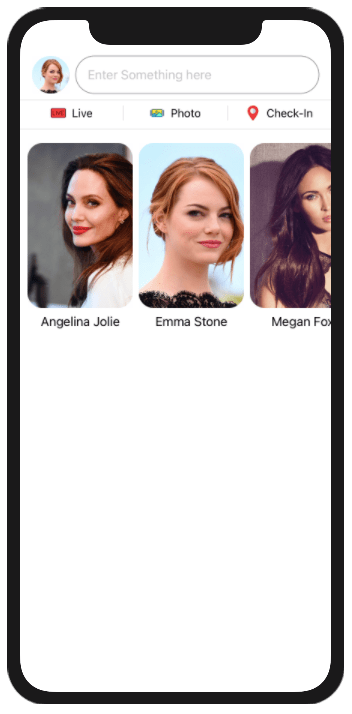
Final Output:
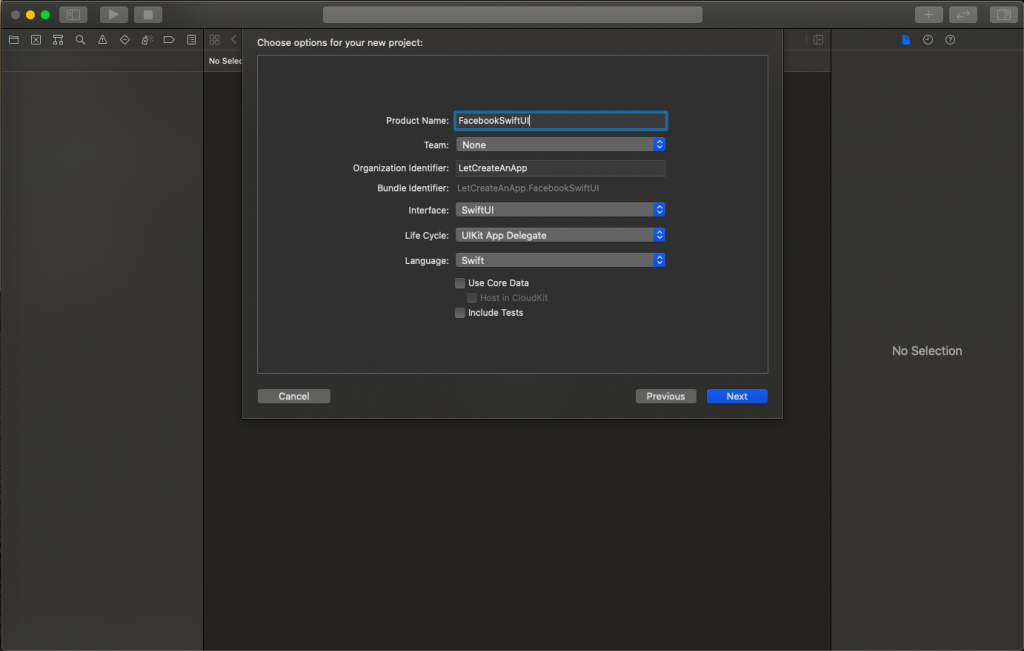
1. Create a New SwiftUI Project
Open Xcode, Select Single View Application and click on next and give a proper name to the project and make sure to select the user interface should be Swift, and create the project.
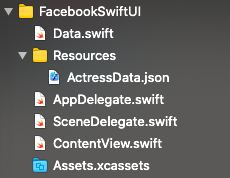
2. Add the Resources
We need to add some images and JSON to load the data into the application. So you need to add the resources before moving to the coding part. You can get the resources from the download button.
After downloading the resources, move the images in Assets.xcassets folder & add the Data.swift and ActressData.json file into the project directory.
3. Design Header
First, we need to design the header part in which we have a user image and search text field.
Take a new SwiftUI class name it HeaderView.swift and add the below code.
import SwiftUI

struct HeaderView: View {

    @Binding var userName: String

    var body: some View {

        VStack {
            HStack {
                 Image("Emma Stone")
                 .resizable()
                 .scaledToFill()
                 .clipped()
                 .frame(width: 50, height: 50)
                 .cornerRadius(25)

                 TextField("Enter Something here", text: $userName)
                 .frame( height: 50)
                     .padding(.leading)
                     .overlay(RoundedRectangle(cornerRadius: 25).stroke(Color.gray, lineWidth: 1))
             }.padding(.leading)
                 .padding(.trailing)

             Divider()

             HStack {
                 // Live
                 Button(action: {
                     print("Live")
                 }) {
                     HStack {
                         Spacer()
                         Image("live").resizable().renderingMode(.original)
                             .frame(width: 20, height: 20)
                         Text("Live")
                             .font(.subheadline).foregroundColor(.black)
                         Spacer()

                     }
                 }
                 Divider()
                     .frame(height: 20)
                 // Photo
                 Button(action: {
                     print("Photo")
                 }) {
                     HStack {
                         Spacer()

Image("image").resizable().renderingMode(.original)
                             .frame(width: 20, height: 20)
                         Text("Photo")
                             .font(.subheadline).foregroundColor(.black)
                         Spacer()

                     }
                 }

                 Divider()
                     .frame(height: 20)

                 // Check_in
                 Button(action: {
                     print("Check-In")
                 }) {
                     HStack {
                         Spacer()

     Image("placeholder").resizable().renderingMode(.original)
                             .frame(width: 20, height: 20)
                         Text("Check-In")
                        .font(.subheadline).foregroundColor(.black)
                         Spacer()


                     }
                 }
             }
             Divider()
         }
     }
 }


 struct HeaderView_Previews: PreviewProvider {
     static var previews: some View {
         HeaderView(userName: .constant(""))
     }
 }
Now move on to the ContentView.swift file and add VStack in it. We are taking VStack cause we want all the elements arranged in vertical order. In VStack we need to add the HeaderView class object at the top and resume the preview section to see the output.
VStack {
   HeaderView(userName: .constant(""))
}
4. Design Story View
Now we will design the story view in which stories will show posted by users.
Take the new SwiftUI class name it StoryView.Swift and add the below code in it.
import SwiftUI

struct StoryView: View {
     var body: some View {

       ScrollView(.horizontal, showsIndicators: false) {
           HStack {
              ForEach(actressModelArray, id: \.self) { model in
                     VStack {
                         Image(model.imageName)
                             .resizable()
                             .scaledToFill()
                             .clipped()
                             .frame(width: 140, height: 220)
                             .cornerRadius(20)

                         Text(model.name)
                     }
                 }
             }.padding(.all, 10)
         }
     }
 }

 struct StoryView_Previews: PreviewProvider {
     static var previews: some View {
         StoryView()
     }
 }
Add the StoryView class object into the ContentView.swift file just below the HeaderView class object.
By default HeaderView() and StoryView() will create in the center, so we need to move these views on the top of the screen by using Spacer().
VStack {
   HeaderView(userName: .constant(""))
   StoryView()
   Spacer()
}
Resume the preview and you will see the this output.
5. Design User Feeds View
Designing user feeds is little complemented, we will need to take a combination of VStack and HStack.
Take the new SwiftUI class name it NewsFeeds.Swift and add the below code in it.
import SwiftUI

struct NewsFeeds: View {

     var userData: ModelClass

     var body: some View {
         VStack {
             VStack(alignment: .leading) {
                 HStack {
                     Image(userData.imageName)
                         .resizable().scaledToFill().clipped().frame(width: 50, height: 50).cornerRadius(25)
                     VStack(alignment: .leading) {
                         Text(userData.name)
                             .font(.system(size: 21, weight: .heavy, design: .default))
                         Text("2 Hr")
                     }
                     Spacer()
                 }

                 Text(userData.description)
             }.padding(.leading, 10)
                 .padding(.trailing, 10)
             Image(userData.imageName)
                 .resizable().scaledToFill().clipped().frame(width: UIScreen.main.bounds.width, height: 300)

             Divider()

             HStack {
                 // Live
                 Button(action: {
                     print("Like")
                 }) {
                     HStack {
                         Spacer()
                         Image("like").resizable().renderingMode(.original)
                             .frame(width: 20, height: 20)
                         Text("like")
                             .font(.subheadline).foregroundColor(.black)
                         Spacer()

                     }
                 }
                 Divider()
                     .frame(height: 20)
                 // Photo
                 Button(action: {
                     print("Comment")
                 }) {
                     HStack {
                         Spacer()

Image("comment").resizable().renderingMode(.original)
                             .frame(width: 20, height: 20)
                         Text("comment")
                             .font(.subheadline).foregroundColor(.black)
                         Spacer()

                     }
                 }

                 Divider()
                     .frame(height: 20)

                 // Check_in
                 Button(action: {
                     print("Share")
                 }) {
                     HStack {
                         Spacer()

Image("share").resizable().renderingMode(.original)
                             .frame(width: 20, height: 20)
                         Text("share")
                             .font(.subheadline).foregroundColor(.black)
                         Spacer()
                     }
                 }
             }
             Divider()
         }
     }
 }


 struct NewsFeeds_Previews: PreviewProvider {
     static var previews: some View {
         NewsFeeds(userData: actressModelArray[0])
     }
 }
Now we need to add the NewsFeeds object in the ContentView.swift file but there are multiple feeds so we need to add the feeds in For Loop and We also need to add the scroll view so feeds can be scrolable.
This is the final code of ContentView.swift
import SwiftUI

struct ContentView: View {
     var body: some View {
         ScrollView(.vertical) {
             VStack {
                 HeaderView(userName: .constant(""))
              StoryView()
              ForEach(actressModelArray, id: \.self) { model in
                     NewsFeeds(userData: model)
                 }
                 Spacer()
             }
         }
     }
 }

struct ContentView_Previews: PreviewProvider {
     static var previews: some View {
         ContentView()
     }
 }
Now run the code and see the output, if you face any issue let me know in the comment section.
The source code of the Facebook Layout can be downloaded at LetCreateAnApp repository Github.
I hope you like this tutorial and if you want any help let me know in the comment section.— there is way more to come! You can follow me on Youtube, Instagram, and Twitter to not miss out on all future Articles and Video tutorials.
. . .
I am really happy you read my article! If you have any suggestions or improvements of any kind let me know! I’d love to hear from you! ????