Creating an application in iOS is very easy, we only need to understand the basic concept and data flow between the screens. In this article, we are going to learn how we can create a QUIZ APP in swift and we are going to learn various new concepts while learning.
We will cover:
- MVVM architecture pattern
- Application Management
- UI Design (Multiplier, Aspect Ratio)
- Closure
- Making View Tapable without tap gesture.
You can come along with me in this development, so download the starter project and learn with me in this development process.
Pre-Requisite
If you dont know how to call the API in swift, please read MVVM in Swift article and then come back on this.
If you want to watch the video tutorial of this article, here you go:
1. Create the User Interface
Let’s first create the User Interface of all the screens in the app. Basically, there are 3 screens in this app.

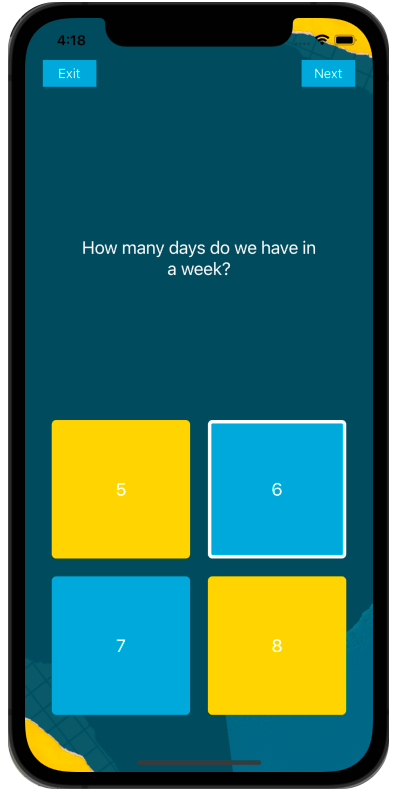
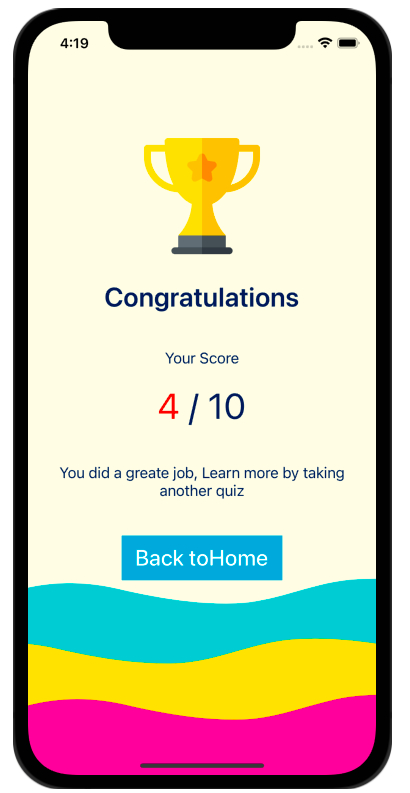
First, we are going to create the UI of all the above screens. With respect to the UI, we also need to define the outlets and actions of the defined elements.
If you face difficulty to create the UI, please watch the video and get the UI done.
We also need to assign the view controller to all the screens.
Home Screen: ViewController.swift
Quiz Screen: QuizViewController.swift
Result Screen: ResultViewController.swift
Quiz Collection Cell: QuizCollectionViewCell.swift
2. Define Outlet’s and Actions
Now we need to create the Outlet and Actions of all the Elements which we have defined on the screen. So let’s start by defining the Outlet and Actions from the Home screen, so we need to create the Outlet’s on ViewController.swift
class ViewController: UIViewController {

    @IBOutlet weak var playButton: UIButton! {
        didSet {
            playButton.layer.cornerRadius = playButton.frame.height/2
        }
    }
    @IBOutlet weak var topicButton: UIButton! {
        didSet {
            topicButton.layer.cornerRadius = topicButton.frame.height/2
        }
    }

    override func viewDidLoad() {
        super.viewDidLoad()
        // Do any additional setup after loading the view.
    }

    @IBAction func onClickPlay(_ sender: Any) {
    }

    @IBAction func onClickTopic(_ sender: Any) {
    }
}
class QuizViewController: UIViewController {
@IBOutlet weak var collectionView: UICollectionView!
override func viewDidLoad() {
super.viewDidLoad()
// Do any additional setup after loading the view.
viewModel.apiToGetQuestionData { [weak self] in
}
}
}class ResultViewController: UIViewController {
@IBOutlet weak var resultLabel: UILabel!
override func viewDidLoad() {
super.viewDidLoad()
// Do any additional setup after loading the view.
}
@IBAction func onClickHome(_ sender: Any) {
}
}Now we also need to define the outlets for the Collection View cell so we can show different options and questions on the screen.
class QuizCollectionViewCell: UICollectionViewCell {

    @IBOutlet weak var questionLabel: UILabel!

    @IBOutlet weak var option1: UILabel!
    @IBOutlet weak var option2: UILabel!
    @IBOutlet weak var option3: UILabel!
    @IBOutlet weak var option4: UILabel!

    @IBOutlet weak var optionA: UIControl!
    @IBOutlet weak var optionB: UIControl!
    @IBOutlet weak var optionC: UIControl!
    @IBOutlet weak var optionD: UIControl!
}
UIControl is the class that we have assigned to all 4 views, after assigning this class we can create action directly from the view.
3. Create logic
Now, let’s move on to the logic part. So first let’s see how we can pass the user from the home screen to the quiz controller.
@IBAction func onClickPlay(_ sender: Any) {
        guard let vc = storyboard?.instantiateViewController(withIdentifier: "QuizViewController") as? QuizViewController else {return}
        self.navigationController?.pushViewController(vc, animated: true)
    }
So, when the user clicks on the play button, it will move on the Quiz screen. This screen is a critical, cause all the logic is written only on this screen.
You also need to change the Estimate Size property to none of collection View.
class QuizViewController: UIViewController {


    @IBOutlet weak var collectionView: UICollectionView!

    var viewModel = QuestionViewModel()
    var quesitions:[Questions]?

    var answerSelected = false
    var isCorrectAnswer = false

    var  points = 0
    var index = 0

    override func viewDidLoad() {
        super.viewDidLoad()

        // Do any additional setup after loading the view.

        viewModel.apiToGetQuestionData { [weak self] in
            self?.quesitions = self?.viewModel.questionData?.data?.questions
            DispatchQueue.main.async {
                self?.collectionView.delegate = self
                self?.collectionView.dataSource = self
                self?.collectionView.reloadData()
            }
        }
    }

    override func viewWillAppear(_ animated: Bool) {
        self.navigationController?.setNavigationBarHidden(true, animated: false)
    }

    @IBAction func onClickExit(_ sender: Any) {
        navigationController?.popToRootViewController(animated: true)
    }

    @IBAction func onClickNext(_ sender: Any) {

        if !answerSelected {
            // Show alert
            let alert = UIAlertController(title: "Select One Option", message: "Please select one option before moving to the next question.", preferredStyle: .alert)
            let okAction = UIAlertAction(title: "Ok", style: .default, handler: nil)
            alert.addAction(okAction)
            present(alert, animated: true, completion: nil)
            return
        }
        answerSelected = false
        if isCorrectAnswer {
            points += 1
        }

        print(index)
        if index<(self.quesitions?.count ?? 0) - 1 {
            index += 1
            collectionView.scrollToItem(at: IndexPath(row: index, section: 0), at: .right, animated: true)

        } else {
            // Move the user on the result controller
            guard let vc = storyboard?.instantiateViewController(withIdentifier: "ResultViewController") as? ResultViewController else {return}
            vc.result = points
            self.navigationController?.pushViewController(vc, animated: true)
        }
    }

}

extension QuizViewController: UICollectionViewDataSource, UICollectionViewDelegate, UICollectionViewDelegateFlowLayout {
    func collectionView(_ collectionView: UICollectionView, numberOfItemsInSection section: Int) -> Int {
        return quesitions?.count ?? 0
    }

    func collectionView(_ collectionView: UICollectionView, cellForItemAt indexPath: IndexPath) -> UICollectionViewCell {
        guard let cell = collectionView.dequeueReusableCell(withReuseIdentifier: "QuizCollectionViewCell", for: indexPath) as? QuizCollectionViewCell else {return QuizCollectionViewCell()}
        cell.optionA.layer.cornerRadius = 5
        cell.optionB.layer.cornerRadius = 5
        cell.optionC.layer.cornerRadius = 5
        cell.optionD.layer.cornerRadius = 5
        cell.setValues = quesitions?[indexPath.row]
        cell.selectedOption = { [weak self] isCorrect in
            self?.answerSelected = true
            self?.isCorrectAnswer = isCorrect
        }
        return cell
    }

    func collectionView(_ collectionView: UICollectionView, layout collectionViewLayout: UICollectionViewLayout, sizeForItemAt indexPath: IndexPath) -> CGSize {
        return CGSize(width: collectionView.frame.width, height: collectionView.frame.height)
    }

    func collectionView(_ collectionView: UICollectionView, layout collectionViewLayout: UICollectionViewLayout, minimumLineSpacingForSectionAt section: Int) -> CGFloat {
        return 0
    }

    func collectionView(_ collectionView: UICollectionView, layout collectionViewLayout: UICollectionViewLayout, minimumInteritemSpacingForSectionAt section: Int) -> CGFloat {
        return 0
    }

}
enum SelectedOption {
    case optionA
    case optionB
    case optionC
    case optionD
}

class QuizCollectionViewCell: UICollectionViewCell {

    @IBOutlet weak var questionLabel: UILabel!

    @IBOutlet weak var option1: UILabel!
    @IBOutlet weak var option2: UILabel!
    @IBOutlet weak var option3: UILabel!
    @IBOutlet weak var option4: UILabel!

    @IBOutlet weak var optionA: UIControl!
    @IBOutlet weak var optionB: UIControl!
    @IBOutlet weak var optionC: UIControl!
    @IBOutlet weak var optionD: UIControl!

    private var correctAnswer: String?

    var setValues: Questions? {
        didSet {
            questionLabel.text = setValues?.question
            option1.text = setValues?.option_1
            option2.text = setValues?.option_2
            option3.text = setValues?.option_3
            option4.text = setValues?.option_4

            correctAnswer = setValues?.correct_answer
        }
    }

    override func prepareForReuse() {
        updateBorder(myView: optionA)
        updateBorder(myView: optionB)
        updateBorder(myView: optionC)
        updateBorder(myView: optionD)
    }

    var selectedOption: ((_ selectedAnswer: Bool) -> Void)?

    @IBAction func onClickOptionA(_ sender: Any) {
        var isCorrect = false

        if correctAnswer == setValues?.option_1 {
            isCorrect = true
        }
        selectedOption?(isCorrect)
        changeBorder(selectedOption: .optionA)
    }

    @IBAction func onClickOptionb(_ sender: Any) {
        var isCorrect = false

        if correctAnswer == setValues?.option_2 {
            isCorrect = true
        }
        selectedOption?(isCorrect)
        changeBorder(selectedOption: .optionB)
    }

    @IBAction func onClickOptionC(_ sender: Any) {
        var isCorrect = false

        if correctAnswer == setValues?.option_3 {
            isCorrect = true
        }
        selectedOption?(isCorrect)
        changeBorder(selectedOption: .optionC)
    }

    @IBAction func onClickOptionD(_ sender: Any) {
        var isCorrect = false

        if correctAnswer == setValues?.option_4 {
            isCorrect = true
        }
        selectedOption?(isCorrect)
        changeBorder(selectedOption: .optionD)
    }

    func changeBorder(selectedOption: SelectedOption) {
        switch selectedOption {
        case .optionA:
            updateBorder(myView: optionA, borderWidth: 4)
            updateBorder(myView: optionB)
            updateBorder(myView: optionC)
            updateBorder(myView: optionD)
        case .optionB:
            updateBorder(myView: optionB, borderWidth: 4)
            updateBorder(myView: optionA)
            updateBorder(myView: optionC)
            updateBorder(myView: optionD)
        case .optionC:
            updateBorder(myView: optionC, borderWidth: 4)
            updateBorder(myView: optionB)
            updateBorder(myView: optionA)
            updateBorder(myView: optionD)
        case .optionD:
            updateBorder(myView: optionD, borderWidth: 4)
            updateBorder(myView: optionB)
            updateBorder(myView: optionC)
            updateBorder(myView: optionA)
        }
    }

    func updateBorder(myView: UIView, borderWidth: CGFloat = 0) {
        myView.layer.borderWidth = borderWidth
        myView.layer.borderColor = UIColor.white.cgColor
    }
}
And on the final note, we will pass the points to the ResultViewController.swift.
class ResultViewController: UIViewController {

    @IBOutlet weak var resultLabel: UILabel!

    var result = 0

    override func viewDidLoad() {
        super.viewDidLoad()
        resultLabel.text = "\(result)"
        // Do any additional setup after loading the view.
    }

    @IBAction func onClickHome(_ sender: Any) {
        navigationController?.popToRootViewController(animated: true)
    }
}
Now we can run the project and check the complete functionality.
Download Resources for MVVM in Swift
Download the source code of Quiz App in swift.
I hope you like this tutorial and if you want any help let me know in the comment section.
Stay tuned, there is way more to come! follow me on Youtube, Instagram, Twitter. So you don’t miss out on all future Articles and Video tutorials.
. . .
I am delighted that you read my article! If you have any suggestions do let me know! I’d love to hear from you. ????

About the Author
Shubham Agarwal is a passionate and technical-driven professional with 5+ years of experience in multiple domains like Salesforce, and iOS Mobile Application Development. He also provides training in both domains, So if you looking for someone to provide you with a basic to advance understanding of any of the domains feel free to contact him



Pingback: How to make UIView Clickable in Swift - Let Create An App
It would be nice to have a video explaining how to implement and setup a firebase database used in this project see we can see how to setup the questions and how to integrate into the script