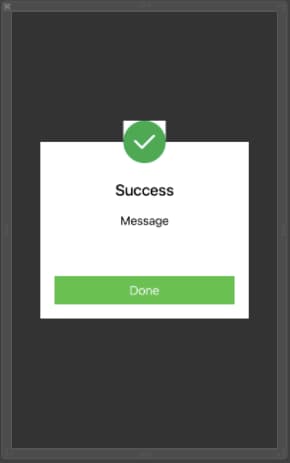
Alerts are a very common way to display the message to the users. Alerts show information to the user which is important and the user must take an action on that. Like we have to delete the item from the list, or the user wants to log out. We will show the confirmation dialog to the user then only we log out the user.
For default alert view, we are having UIAlertController which work perfect, but what if we want some complex UI as per our need, in that case we need to create our own custom alert view class.
Here’s is the video if you prefer video over text.
1. Create a New Swift Project
Open Xcode, Select App and click on next and give a proper name to the project and make sure to select the user interface should be Swift, and create the new project. Give the name according to your need.
2. Create Alert View XIB and Alert View class
Now, we need to create a xib (AlertView.xib) for the alert view so we can call this view whenever we needed. We will configure this xib in the way by which this xib can work for both, for success alert and for failure alert.

Take a new class AlertView.swift for this XIB and create the outlet for all the UI elements of this XIB. AlertView.swift is a singleton class so it will create a single instance of that class and we can directly call this class by name. Initialize this class with the required configuration.
class AlertView: UIView {

   static let instance = AlertView()

   @IBOutlet var parentView: UIView!
   @IBOutlet weak var alertView: UIView!
   @IBOutlet weak var img: UIImageView!
   @IBOutlet weak var titleLbl: UILabel!
   @IBOutlet weak var messageLbl: UILabel!
   @IBOutlet weak var doneBtn: UIButton!

   override init(frame: CGRect) {
       super.init(frame: frame)
       Bundle.main.loadNibNamed("AlertView", owner: self, options: nil)
       commonInit()
   }

   required init?(coder aDecoder: NSCoder) {
       fatalError("init(coder:) has not been implemented")
   }

   private func commonInit() {
       img.layer.cornerRadius = 30
       img.layer.borderColor = UIColor.white.cgColor
       img.layer.borderWidth = 2

       alertView.layer.cornerRadius = 10

       parentView.frame = CGRect(x: 0, y: 0, width: UIScreen.main.bounds.width, height: UIScreen.main.bounds.height)
       parentView.autoresizingMask = [.flexibleHeight, .flexibleWidth]
   }
Now, create enum of alert type, so we can show the alert as per our need. Then we need to create function which get called to show the alert on the screen. We are configuring the AlertView according to the alertType, for success we are using green colour and for failure we are using red.
enum AlertType {
       case success
       case failure
     }

func showAlert(title: String, message: String, alertType: AlertType) {
       self.titleLbl.text = title
       self.messageLbl.text = message

       switch alertType {
       case .success:
           img.image = UIImage(named: "Success")
           doneBtn.backgroundColor =  colorLiteral(red: 0.3411764801, green: 0.6235294342, blue: 0.1686274558, alpha: 1)
       case .failure:
           img.image = UIImage(named: "Failure")
           doneBtn.backgroundColor =  colorLiteral(red: 0.9254902005, green: 0.2352941185, blue: 0.1019607857, alpha: 1)
       }

       UIApplication.shared.keyWindow?.addSubview(parentView)
}
By calling this method we are able to show the alert on the screen. But we are not removing the alert view from the screen. So we will remove the alert view from super view when user tap on Done button.
@IBAction func onClickDone(_ sender: Any) {
     parentView.removeFromSuperview()
}
We are done with AlertView.swift class, now we only need to call this method from the view controller class so we can show the alert on the screen.
You can simply call this method with message, title, and alertType according to you need so it can show the message accordingly.
AlertView.instance.showAlert(title: "Success", message: "You are succesfully loged into the system.", alertType: .success) Now we can run the project and check the complete functionality.
Download Resources for Custom Alert View Swift
You can download the source code of Custom Alert View Swift project from this Link.
I hope you like this tutorial and if you want any help let me know in the comment section.
Stay tuned, there is way more to come! follow me on Youtube, Instagram, Twitter. So you don’t miss out on all future Articles and Video tutorials.
. . .
I am delighted that you read my article! If you have any suggestions do let me know! I’d love to hear from you. ????

About the Author
Shubham Agarwal is a passionate and technical-driven professional with 5+ years of experience in multiple domains like Salesforce, and iOS Mobile Application Development. He also provides training in both domains, So if you looking for someone to provide you with a basic to advance understanding of any of the domains feel free to contact him


I really like your blog.. very nice colors & theme. Did you make this website yourself or did you hire someone to do it for you? Plz respond as I’m looking to design my own blog and would like to know where u got this from. thanks
Hello, I really liked the post, it has really helped me a lot, I only have one question, if the background of the alert is an image that can change according to its orientation, if it is in landscape or portrait, how can I do it with swift? Thank you so much.
Hi, I really liked the post, it has really helped me a lot, I only have one question, if the background of the alert is an image that can change according to its orientation, if it is in landscape or portrait, how can I do it with swift? Thank you so much.