In iOS, When we are working on creating an apps, we have multiple view controllers sometimes, we need to pass the data from one controller to another controller OR from tableView cell to another controller, by using properties we can easily send the data from tableView cell to another controller according to our requirement.
In this tutorial, We will talk about how we can pass data from tableView cell to another controller using properties. Passing data by using properties is very simple and used in day to day development.
If you want to watch the video tutorial of this article, here you go:
1. Create a New Swift Project
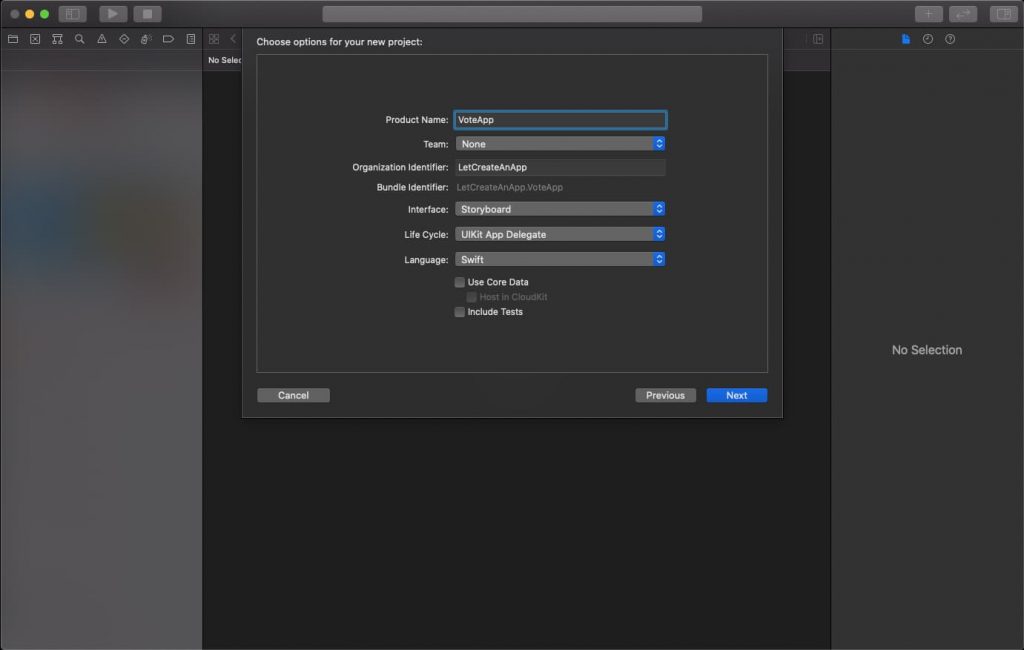
Open Xcode, Select App and click on next and give a proper name to the project and make sure to select the user interface should be Swift, and create the new project. Give the name according to your need.
2. Design the Basic List Layout
After creating the project we need to move on the main.storyboard and we have design the basic layout, which we have seen. In this tutorial we are not focused on design part, but you can design the things as per your need.
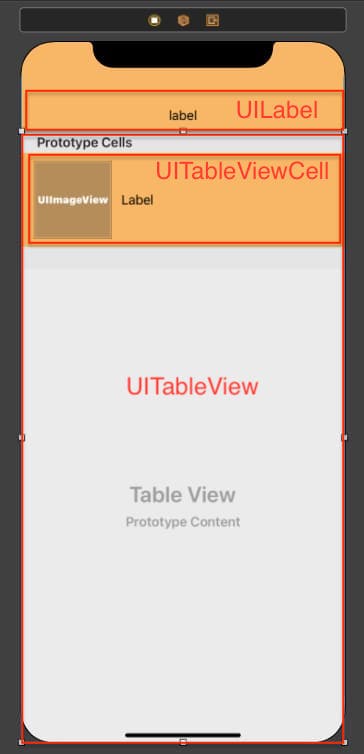
Follow steps to create list design.
- Take UILabel and drop it on the screen and give constraints top = 30, leading = 20, trailing = 20, height = 40 and also make the text alignment to center.
- Now, take UITableView and drop it on the Storyboard below the title label and give constraints top = 0, leading = 0, trailing = 0, bottom = 0.
- For UITableView Cell take one UIImageView and give constraints height = 100, width = 100, leading = 12, make vertical center in container. Change the content mode to aspect fill.
- Take UILabel on the UITableView cell and give constraints leading = 12, trailing = 12, make vertical center in container.
Confirm the datasource and delegate of UITableView from the storyboard itself. If you followed the above instruction you will get the design something like the below image.
Let’s Do some coding for list
Now let’s move on the View Controller and let’s do some coding.
First we need to take the Outlets of all the UI elements on the ViewController.swift and let’s populate the UITableView with the dummy data. To get the dummy data please download the final project the link it at the end of the article.
@IBOutlet weak var tableView: UITableView!
@IBOutlet weak var lbl: UILabel!
Let’s take one array in which we store the names of all the bags. I have taken same name as the bag images, so I will use the same name of image as the bag name. Also provide the value to lbl property.
var names = ["Urban Carrier","Haute Zone","StrapIt","Pursify","HerCraft Bags","AdVenture Bags","Busy Bee Bags","Baganic"]

override func viewDidLoad() {
      super.viewDidLoad()
      lbl.text = "Bags"
}
Now lets populate the UITableView with dummy data.
For good practice, we always take an extension to define the delegate method. Using extension, we separate the code from other functionality and it also increase the code readability.
extension ViewController: UITableViewDelegate, UITableViewDataSource {

     func tableView(_ tableView: UITableView, numberOfRowsInSection section: Int) -> Int {
         return names.count
     }

     func tableView(_ tableView: UITableView, cellForRowAt indexPath: IndexPath) -> UITableViewCell {
         let cell = tableView.dequeueReusableCell(withIdentifier: "cell", for: indexPath) as? CellTableViewCell
         cell?.lbl.text = names[indexPath.row]
         cell?.img.image = UIImage(named: names[indexPath.row] )
         return cell!
     }

     func tableView(_ tableView: UITableView, heightForRowAt indexPath: IndexPath) -> CGFloat {
         120
     }
 }
Now, run the Application you will see the output something like the below image.

3. Design the Detail Page
Now, we have to move on the detail page when user will click on any of the tableView cell. So we need to integrate the one more delegate method in the extension of UITableView, So when user click on any of the cell it will move on detail page with that bad information. Before moving into the coding lets first design the detail page.
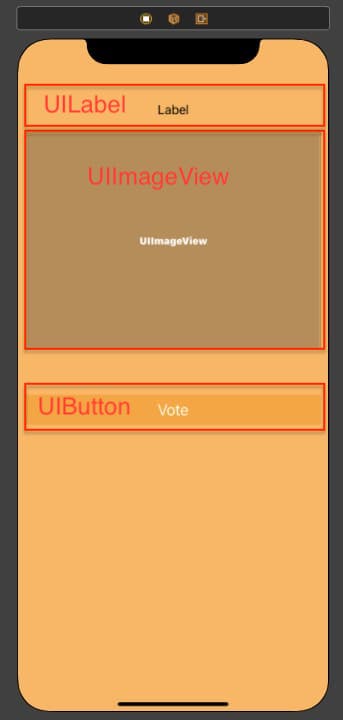
Follow steps to create detail page design.
- Take UILabel and drop it on the screen and give constraints top = 30, leading = 20, trailing = 20, height = 40 and also make the text alignment to center.
- Now, take UIImageView and give the constraints top = 0, leading = 20, trailing = 20, height = 260. You can change the height according to your need.
- Implement UIButton at the bottom and give constraints top = 30, leading = 20, trailing = 20 height = 40.
You can change the design of detail page as per your need. This design is just for demo purpose.
Let’s Do some coding for Detail Page
First create the Outlet’s of the UI elements, and create local properties on which data will be assign from list controller.
@IBOutlet weak var lbl: UILabel!
@IBOutlet weak var img: UIImageView!
var image = UIImage()
var name = "" Now assign these local properties to UI elements in view viewDidLoad() method as shown in the below code.
override func viewDidLoad() {
      super.viewDidLoad()
      lbl.text = "You selected \(name) for vote"
      img.image = image
}
4. Final Step(Pass the Data)
Let’s integrate the delegate method in the extension on the ViewController.swift, so when user will click any of the cell, it will pass the data of that cell to next controller properties.
Add the below method to the extension. In this method we are creating object of detail controller as vc, and using that vc we are passing the required properties on the detail controller and after that we are pushing on the detail controller.
func tableView(_ tableView: UITableView, didSelectRowAt indexPath: IndexPath) {
       let vc = storyboard?.instantiateViewController(withIdentifier: "DetailViewController") as? DetailViewController
       vc?.image = UIImage(named: names[indexPath.row] )!
       vc?.name = names[indexPath.row]
       navigationController?.pushViewController(vc!, animated: true)
}
Now, you run the application you can able to see the list but unable to push on the details controller. The reason behind this is, for pushing any controller we need UINavigationController, But in our storyboard there is no UINavigationController. So let’s add UINavigationController on the ViewController.
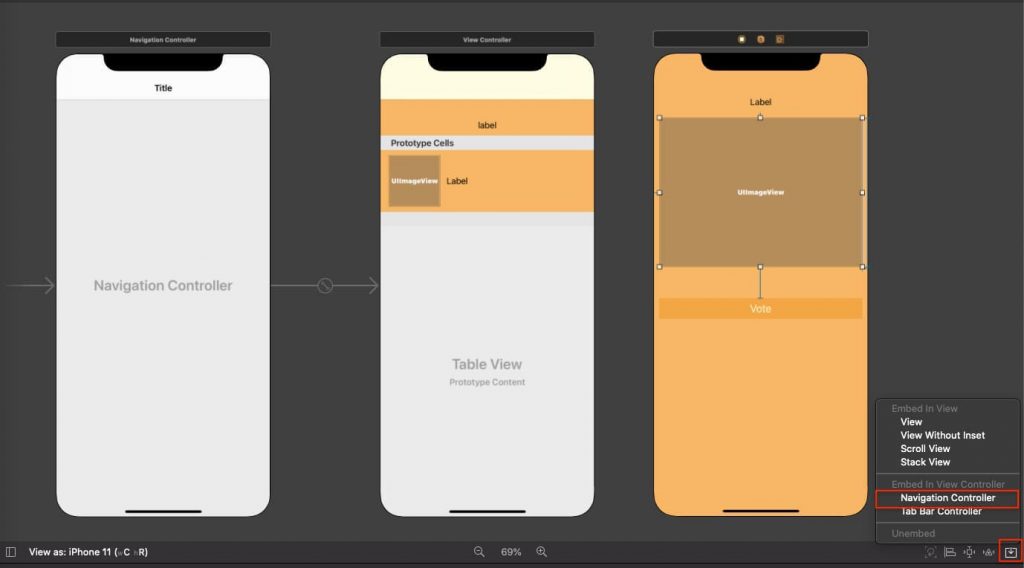
We are all set, now you can run the project and check the complete functionality.
Download Resources for Model View Controller in Swift
Download the source code of Pass data from TableView Cell to Another Controller.
I hope you like this tutorial and if you want any help let me know in the comment section.
Stay tuned, there is way more to come! follow me on Youtube, Instagram, Twitter. So you don’t miss out on all future Articles and Video tutorials.
. . .
I am delighted that you read my article! If you have any suggestions do let me know! I’d love to hear from you. ????

About the Author
Shubham Agarwal is a passionate and technical-driven professional with 5+ years of experience in multiple domains like Salesforce, and iOS Mobile Application Development. He also provides training in both domains, So if you looking for someone to provide you with a basic to advance understanding of any of the domains feel free to contact him
