Whenever we have to show the multiple items on the list, the first thing that comes to mind is UITableView. UITableView is the essential UI component in iOS Application Development.
UITableView with sections allows us to separate the list into different categories, so the list looks more organized and readable. We can customize sections as per our need, but in this tutorial, we are covering the basic UITableview with sections.
Here’s is the video if you prefer video over text.
1. Create a New Swift Project
Open Xcode, Select App and click on next and give a proper name to the project and make sure to select the user interface should be Swift, and create the new project. Give the name according to your need.
2. Setup UITableView on Storyboard.
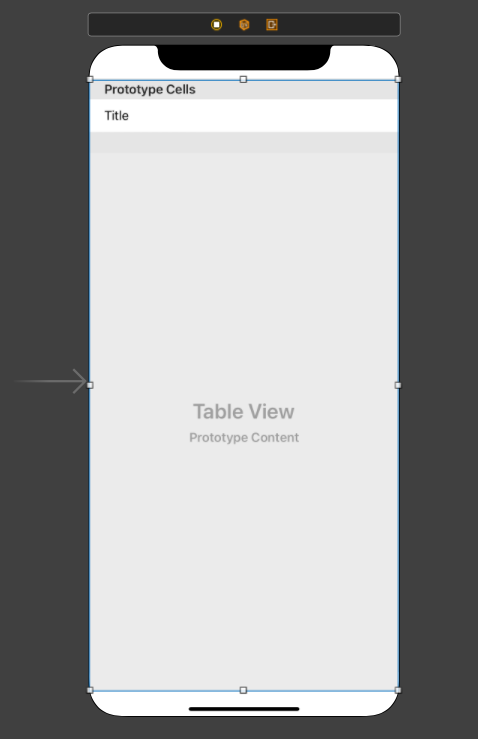
First, we need to setup the UITableView on the storyboard, so for that take UITableView from the library and drag and drop it on UIViewController on storyboard. Apply constraints to tableview with view with all the four side should be 0. You can update these constraint according to your need.
Now, we need to design the UITableViewCell on which we will show the list of all the models of the specific company, as you can see in the image. We also need to assign the DataSource and Delegate to this UITableView by dragging the on the view controller.

3. Create Variable and Model
Now, we need to define the data source and delegate method of tableview, so it can show the data on the screen.
First, we need to define the Model on which data get stored and this model uses when we load the data.
class MobileBrand {
   var brandName: String?
   var modelName: [String]?

   init(brandName: String, modelName: [String]) {
       self.brandName = brandName
       self.modelName = modelName
   }
}
In the ViewController class, we need to take the outlet of the UITableView and also need to create one variable to store the mobile data.
@IBOutlet weak var tableView: UITableView!

var mobileBrand = [MobileBrand]()
Variable mobileBrand has no data at initial, we need to add the mobile-related data into this variable mobileBrand when the view controller gets initialize. In the viewDidLoad method, we need to add the below code this will add the mobiles related data into this object.
override func viewDidLoad() {
     super.viewDidLoad()

       mobileBrand.append(MobileBrand.init(brandName: "Apple", modelName: ["iPhone 5s","iPhone 6","iPhone 6s", "iPhone 7+", "iPhone 8", "iPhone 8+", "iPhone 11", "iPhone 11 Pro"]))
       mobileBrand.append(MobileBrand.init(brandName: "Samsung", modelName: ["Samsung M Series", "Samsung Galaxy Note 9", "Samsung Galaxy Note 9+", "Samsung Galaxy Note 10", "Samsung Galaxy Note 10 +"]))
       mobileBrand.append(MobileBrand.init(brandName: "Mi", modelName: ["Mi Note 7", "Mi Note 7 Pro", "Mi K20"]))
         mobileBrand.append(MobileBrand.init(brandName: "Huawei", modelName: ["Huawei Mate 20", "Huawei P30 Pro", "Huawei P10 Plus", "Huawei P20"]))

   }
Now, we need to populate the tableview, so it can show the mobiles in the list with their categories.
3. Define DataSource & Delegate
DataSource and Delegate allow us to load the data into the table view and show it on the screen, but when we need to add the section into the tableView we need to add some more methods which have their own meaning.
First, we need to create the sections on which each mobile category will show like Apple, Samsung, etc. In this, we return the number of elements we have in the mobileBrand array.
func numberOfSections(in tableView: UITableView) -> Int {
       return mobileBrand.count
}
Now, we need to design the section header and assign the category to the label:
func tableView(_ tableView: UITableView, viewForHeaderInSection section: Int) -> UIView? {
       let view = UIView(frame: CGRect(x: 0, y: 0, width: tableView.frame.width, height: 40))
       view.backgroundColor =  colorLiteral(red: 1, green: 0.3653766513, blue: 0.1507387459, alpha: 1)

       let lbl = UILabel(frame: CGRect(x: 15, y: 0, width: view.frame.width - 15, height: 40))
       lbl.font = UIFont.systemFont(ofSize: 20)
       lbl.text = mobileBrand[section].brandName
       view.addSubview(lbl)
       return view
     }
We have designed the section header and assigned the category to the label, now populate the table view as we are doing normally. We have to load the values in the row on the basis of the section.
func tableView(_ tableView: UITableView, numberOfRowsInSection section: Int) -> Int {
    return mobileBrand[section].modelName?.count ?? 0
}

func tableView(_ tableView: UITableView, cellForRowAt indexPath: IndexPath) -> UITableViewCell {
       let cell = tableView.dequeueReusableCell(withIdentifier: "cell", for: indexPath)
       cell.textLabel?.text = mobileBrand[indexPath.section].modelName?[indexPath.row]
       return cell
}

func tableView(_ tableView: UITableView, heightForHeaderInSection section: Int) -> CGFloat {
       return 40
}

func tableView(_ tableView: UITableView, heightForRowAt indexPath: IndexPath) -> CGFloat {
       return 40
}
Now we can run the project and check the complete functionality.
Download Resources for Create UITableView with sections in Swift 5
You can download the source code of Create UITableView with sections in Swift 5 project from this Link.
I hope you like this tutorial and if you want any help let me know in the comment section.
Stay tuned, there is way more to come! follow me on Youtube, Instagram, Twitter. So you don’t miss out on all future Articles and Video tutorials.
. . .
I am delighted that you read my article! If you have any suggestions do let me know! I’d love to hear from you. ????

About the Author
Shubham Agarwal is a passionate and technical-driven professional with 5+ years of experience in multiple domains like Salesforce, and iOS Mobile Application Development. He also provides training in both domains, So if you looking for someone to provide you with a basic to advance understanding of any of the domains feel free to contact him


